Tuesday, August 25, 2015

DIY backyard sandbox

Enjoying his new sandbox with his cousin

Earlier this summer I made a super easy sandbox for my 2-year old to play in with his "diggers" and shovels. My goal was to make the backyard a really fun place where he could play and be entertained so that maybe, just MAYBE, I could read my novel outdoor in the sunshine in relative peace.

At Lowes I found this 4'x4' raised garden kit in a box consisting of 4 plastic boards, hinges for the corners and 4 stakes to secure it into the ground. After some 6th grade math that hurt my brain, I figured I'd need 9 bags of "Play Sand" which, apparently is a commonly stocked thing and it's meant for sandboxes. Who knew!

Just remember when buying bags of play sand - 
width times height times depth equals volume... I think? 

I also bought 4 red, resin-coated pieces of rebar (sold as garden stakes) that were about 5 feet long. I thought it'd be cool to use them to string some fiesta flags around the edges of the finished sandbox.

At home, I assembled the frame according to directions using a drill to attach the corner hinges and a rubber mallet to pound the stakes into the ground. I placed it right on top of the grass. Then I schlepped 2 bags of sand at a time with a wheelbarrow from my car to the backyard, sliced them open and dumped away. A bit of raking evened out the sand and the stakes and flags (attached with zip ties) gave it a festive flair.


When Alexander woke up from his nap I hurried him outside to see and he exclaimed, "A beach!" He loves it and has been playing in it all summer. His favorite thing now is to write numbers and letters in the sand and then "erase" them.


PROJECT REFLECTIONS
Total cost: $135.00
     $90 for raised bed kit, $45 for 9, 50-pound bags of play sand
Easiest part: getting a Lowes employee to help me load up the sand bags into my cart and then again into my car.
Hardest part: I guess schlepping the sand bags and dumping them out. So heavy.
What I'd do differently next time: Figure out a better way to attach the flags.
What I learned: You really DO use that 6th grade math when you grow up!
 

$4 thrift store lamp makeover

 The repainted lamp looking pretty fly on the madeover desk

I found this metal lamp at Value Village for $3.99. It had cool lines and I immediately knew that with a paint job it would be a killer piece for my sister's new office. 


I wrapped the cord and covered the inside edge of the lamp shade with painter tape, then started spraying a copper paint. It took about 3 coats to completely cover it and in maybe 2 hours I had a great-looking lamp that complemented the makeover desk quite nicely


PROJECT REFLECTIONS:
Total cost: $11
     $4 for the lamp. $7 for the paint
Easiest part: The painting was so easy.
Hardest part: tightening the loose fasteners.
What I'd do differently next time: I'd paint a little more carefully because it can definitely start to run on the curved parts.
What I learned: That the thrift store is a great place for finding reusable pieces! (I'm not a huge thrifter to begin with.)

Ugly desk makeover using spray paint & shims


 The finished product!

This furniture makeover project turned out way better than I could have ever imagined. My sister had a new office full of drab old, standard-issue furniture - chipboard and vinyl veneer with rubber trim.

I worked with her on a TINY budget to design a new, mod space that sparked creativity! (I still need to take photos of it...)

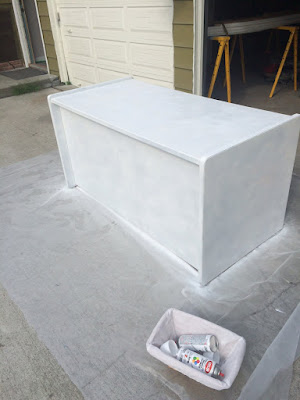
Instead of buying a new desk, I spray painted the existing one after scrubbing it with TSP. I used 6 cans of high gloss white paint.


The desk "before" photo.
After maybe 2-3 cans of spray paint. Still needed a lot more!
Playing with the shim pattern before adhering the wood to the desk.

Next, I used about 15 packages of wooden shims to tile the front of the desk. I attached them with Liquid Nails and a caulk gun. Some of the thinner shims wanted to curl up once wet with the adhesive, and those I tried to weigh down but it didn't work. Ultimately I replaced them with thicker pieces. I made an effort to vary the color and direction and size of the shims so the overall effect had the most visual interest.

The desk turned up on its side for affixing the shims. I started in the middle top and worked my way out and down from there, cutting the extreme left and right edges to size.

The final product turned out so cool! It reminds me of a beachy yet modern hotel lobby desk. My sister likes it and it definitely doesn't look like a tired old piece of used office furniture now.


PROJECT REFLECTIONS
Total cost: $55.00
     $30 for spray paint; $24 for wooden shims; $3 for Liquid Nails
Easiest part: Tiling on the shims - it was strangely hypnotic and it went quickly.
Hardest part: The spray painting sucked. It didn't stick well to the vinyl coating and my finger started to cramp from pressing the button for so long. 
What I'd do differently next time: Start with 4 clean pieces of wood and build a simple 4-sided desk from scratch, then paint with a low-nap paint roller. 
What I learned: That wooden shims make great-looking tiles! Seriously, I cannot overstate how much I love the look of this. :)

DIY plant hanger from 2 pieces of rope

 Just a cool plant hanging out...

This spider plant I started from a clipping is finally big enough that it really needed to hang so the leaves wouldn't get smooshed. So I cut two lengths of rough sisal rope, folded them in half to make 4 strands, wound some leftover trim around the 4 cut ends and cinched it tightly to form the bottom. Then I tied a knot near the top to make a hanging loop and voila! an easy, rustic chic plant hanger more than sturdy enough to hold a heavy concrete planter. Once the planter is inside, the weight of it keeps the ropes taut and the plant stationary. 


To hang it up, I drilled a hole in the ceiling and used a toggle bolt, a headless screw and a decorative hook threaded onto one end to provide a secure place to hang the whole thing. I had a length of trim left still and I strung it for a bit more visual interest. I love how this turned out and I'll definitely make more.


PROJECT REFLECTIONS
Total cost: Free! Everything I used I already had in the house.
Easiest part: Working with only 2 pieces of rope.
Hardest part: Drilling the hole big enough in the ceiling for the toggle bolt to fit up into, but even that wasn't hard, just dusty.
What I'd do differently next time: Maybe try differently colored ropes or wrap the ropes in embroidery thread for more color.
What I learned: I always forget to use horizontal space, so it was a good reminder to look up!